

Tuesday, September 25, 2007
Sunday, September 23, 2007
A Birthday hat for the little prince!

I have had a scads of emails asking how this was done so here goes. First cut stretchy ribbed velvet fabric to be ½ inch wider than a newborn sock hat was around and about 12 inches long. With the right side of the fabric to the inside, sew it down the length to form a tube. Once that is done, sew a gathering stitch around the tube opening on both ends. Gather the first end and tack it down by hand. Then turn the tube inside out so the right side of the fabric is to the outside. Gather up the other end making sure to tuck the raw edge of the fabric to the inside. You should have something that looks like an empty bolster pillow now. Bring both gathered ends together so that the gathered “rings” are touching, folding the fabric over one hand. You should have something that looks like a sock hat now. Pin two pieces of ribbon to the bottom edge of the hat so that they cross at the top. Cut a strip of stretchy fur (make sure the back of the fur stretches or the hat will not stretch around the babies head) long enough to go around the bottom of the hat. Pin to the bottom edge of the hat with the fur to the inside. Using a stretch stitch sew the fir and ribbon to the bottom edge of the hat. Hand stitch the ends of the fur together. Roll the fur up to cover the ends of the ribbon. Tucking the raw edge of the fun in, loosely hand stitch the fur to the hat. Make sure you leave plenty of thread for stretching. Make a little pom pom from gold embroidery thread. Gather the ribbon at the top stitching down by hand and attach the pom pom. Use a permeate marker to make the black dots around the white fur and your done.

Saturday, September 22, 2007
Stamping fun day!

I had a very good time yesterday at the local stamp club meeting. My friend Carolyn showed me how to make this soooo cute little paper purse. She also incorporates these into her cards, by putting them inside with little tags in the pockets!
Ok my friend Carolyn has put the instructions up on her blog have fun with this!
Tuesday, September 18, 2007
Finished Hats

Although I had planned on just showing these here, I went and showed them off in a couple of my stamping groups. Because of several people asked for my pattern and instructions, I have been working on getting them written up. I will be posting that and some close up pictures tomorrow on my website if you are interested.
Monday, September 10, 2007

Wrapping it up!

Sunday, September 9, 2007
The Wait

Inspired by everything I saw when I was blog hopping yesterday, I made this card this morning :)
Halloween eye candy

Since our local stamp clubs theme this month was Halloween I also joined a swap in one of my yahoo clubs. Then I just made two of each card. These are the two I liked the best.

The 31st


A Kaleidoscope for my sister Judy

Kaleidoscope made from wrapping paper rolls for my sister’s Birthday. As you turn the base around the clown in the diamond shaped window changes.
To make this you will need to find two cardboard tubes, one slightly smaller than the other. I used a wrapping paper tube and then a ribbon tube. You will also need a plastic bead container the size of the tube with the larger diameter (Pic.2). I found several sizes at my local bead store. Decide how long you want your kaleidoscope and cut the tube with the smaller diameter that length. Then cut the larger diameter tube about 1/3 the length of the smaller diameter tube. You will also need to cut 3 strips of mirror all the same length as the smaller diameter tube but one needs to be slightly narrower in width. They also need to be able to fit in the smaller tube when taped together as you see in picture 3. You can make a pattern out of cardboard until you come up with the right sizes. These strips also need to be of thin mirror, as you would find in those mirror tiles that you stick to walls. If you feel you can’t do this part you can always go to your local glass shop and have them cut. Once you have your pieces assembled, slightly tape the mirror strips together enough to hold the shape (pic. 3) and insert them into the tube. Use a bamboo skewer with E600 or Liquid Nails along the length to reach inside the tube and glue the mirror strips in place.

Place some broken glass, beads, glitter or whatever you like inside your bead container. Cover the entire rim with liquid nails and close the two pieces together. Run a bead of liquid nails around the diameter of the sides of the bead container. Wet your finger and smooth it out being careful not to get glue on the top or the bottom. If you do, wipe it off with alcohol or Goo Gone right away. Set the bead container aside to dry. Once it is completely dry, drill a hole in the side with a dremel (pic. 5). Use a craft syringe to fill it with Mineral Oil (Pic. 6). Make sure it is completely full and there is no air inside. Prop it up on each side so that it will sit on a table unaided. Clean any oil that may be around the hole off with alcohol not Goo Gone as Goo Gone is oily. Once dry cut a small square of acetate large enough to cover the hole. Cover one side of the acetate with Liquid Nails and carefully place over the hole. Once that has dried cover the top of the acetate and completely to the sides of the bead container with Liquid Nails to make a tight seal.

Cut a strip of scrap paper to fit around the larger diameter tube. It will also need to be a little longer than the tube so that it will cover the bead container also when it has been glued to the end of the larger diameter tube. This will be the pattern you use to decide where you will place your window when you stamp your cardstock that will cover the larger diameter tube. Fold the pattern in half then in half again. Use the fold lines to mark out the pattern you will be using (Pic. 7). Stamp the cardstock for both tubes and glue onto the tubes and cut the window out. Choose a piece of braiding that will easily fold in half. Glue this around the end of the larger diameter tube with one half of the braiding off the edge of the tube. Run a bead of glue on the inside edge of the braiding that is hanging off the edge as you see in picture 9.
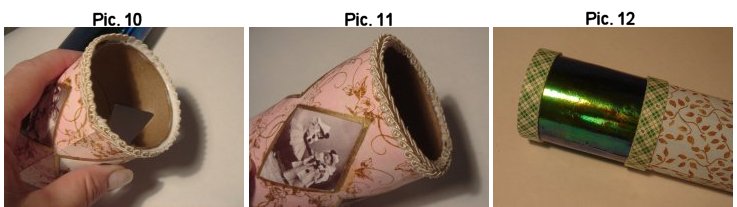
Once the glue has dried slightly, fold to the inside of the tube and let dry (Pic.11). This will form a rim that will hold the larger tube in place later. Place a ring of foam mounting tape at the bottom of the smaller diameter tube and again on the smaller diameter tube where the top of the larger diameter tube will cover (Pic. 12). Do not remove the top tape cover (green plaid) but do tape the ends of the foam tape cover together with standard tape. This will create a surface for the larger tube to ride on and also create a stop for the braided rim. Once the braiding is dry, slide the larger tube over the smaller diameter tube from the top so that the braided rim you just made hits against the foam mounting tape stop.

Once the bead container has once again dried, glue it in place on the end of larger diameter tube (Pic. 13). Glue some pretty braiding around the bottom end also (Pic. 14). As you turn the larger diameter tube decide where you would like your images I used collage sheets available at my etsy store and place them accordingly. This way as you turn the base the image in the window will change.

Cut a circle of cardstock the diameter of the smaller tube, cutting a peep hole in the center of that. Decorate as you like and glue on the open end. Cover the edge with braiding add some bling and your finished. Peek through the peep hole and enjoy!
My Muse

Subscribe to:
Posts (Atom)
