Showing posts with label Techniques. Show all posts

Saturday, November 16, 2013

Punch & Judy Free Printable

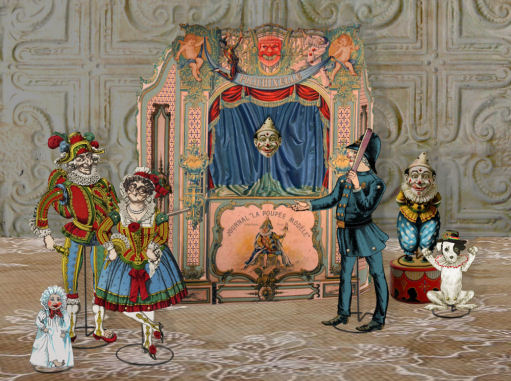
I do have a free printable for you but first let me show you what I have been working on. As much as I wanted to get my nutcracker theater done this year, I needed to make sure this was done for Christmas. The two main puppets were from an early 1800's magazine and were so poorly printed it literately took me weeks to complete them.


Someone very special to me, who happens to be a big Punch & Judy fan, is going to get a kit for this for Christmas. I have had the theater printed larger than my printer will print but I am going to print the puppets large myself. Then I will put it in a special box I am working on with the chip board, brads, glue and so on so that she can make it herself. The graphic's for this are now available in my little etsy store.

As you know... I usually try to make my free image go along with whatever I am working on so I have a cute little Punch and Judy free printable for you. I thought it would make a great invitation to your show or Punch & Judy birthday party, or as I have used it to create a box lid for the little theater to go into.


If you check it out in its larger version, I think you will be able to tell how clear I can make these vintage images :)

Feel free to pin the thumb above but please do not pin the actual download. I would like everyone to stop by here to download it so they don't miss all my other fun free downloads.


I also would like to post a little history on Punch and Judy:
 
May 9, 1662 is the day that is credited as Punch's birthday as that was the first recorded day his show was preformed in Britain. The British show developed into "Punch and Judy" with its first published script in 1827.  However the show was preformed in the 1700 in Italy only the puppets had a different names, Pulcinella and his wife Joan. 
 He speaks in a distinctive squawking voice, assisted by a "Bottler", who encouraged to participate and collecting money. The Bottler also played accompanying music or sound effects usually on a drum. Today it is preformed often in private parties and is fun for all ages.


Wednesday, July 14, 2010

Wedded Bliss for Something Blue

This is the last week of the wedding theme sayings over at Mixed Media Monday and since I have done nothing with a wedding theme I did this little wedding card. I also did this one because I wanted to share a technique I have been playing with. Crackle paint can be so expensive but this is a Fun inexpensive alternative to crackle paint and glaze.


This easy technique is done with cheap Elmer's school glue ...really any cheap white glue works, I even tried the stuff from the dollar store. I discovered glue crackle on the internet but found the explanations very limited. I not only wanted to crackle paint for backgrounds but I also wanted to crackle clear glaze to use on my images. As hard as I searched I found nothing on crackling clear glaze.... sooo I did a lot of experimenting with different glues and glazes and found that the cheep white school glue works best for this technique. There is no difference if you use the clear or white. Most any water based glue will work however Mod Podge doesn’t work at all

To crackle paint:
Step1.
Using acrylic paint, choose the color you would like your cracks to be and paint the surface of your project. Let it dry completely. This works on wood metal paper and even cloth. If your doing this on paper you can just use unpainted card stock in the color of choice so just skip this first step.

Step 2.
Cover the painted surface with glue. The thickness of the glue will determine the size of your cracks. A thin glue layer will result in a fine crack, the thicker the glue the larger and wider the crack. For a very fine crack it is best to thin the glue a bit. I found using my hands worked better than a brush for spreading on the glue. You have to work fast... I got a more even coverage and I was able to control the thickness of the glue much easier. It also eliminated brush marks.

Step 3.
Do not let the glue dry completely. It must still be tacky if you want it to crack. For thin glue let it dry about 3 minutes and for the thicker glue about 5 to 8 minutes. Once tacky cover the surface with Acrylic paint. Again I found using my hands worked best. The cracking starts pretty quickly and it is really fun to watch.


For a clear crackle over an image
Step1.
It is done much the same, cover the printed surface with glue. I used a lazer print. I think the ink would run with an ink jet image. Again, the thickness of the glue will determine the size of your cracks. A thin glue layer will result in a fine crack, the thicker the glue the larger and wider the crack.

Step 2
Once the glue is tacky, paint on a clear water base varnish. I used the Delta Ceramcoat satin interior varnish. I also tried several others and they all worked well.

I enhanced the cracks for my example because they did not show up great in a photo. However on a small image with a face your cracks may not look so great enhanced. I had to do the image above several times before I had an image where the bride did not look like she was crying ...lol. In real life the cracks are really visible without any enhancement.


Monday, October 19, 2009

Molding Kewpie or Charlotte's


The other day I was working on a silver spoon necklace and I wanted to add a little antique doll. Well the doll was too big for the spoon so I decided to make one from polymer clay. After struggling with it for hours I finally got one I liked...that is when it dawned on me I could have just made a mold of one of my plastic charms to use... so I did that too. I think they came out pretty kewl. I used just regular sculpy and used hand lotion for a release agent. After buttering two slabs with hand lotion, I sandwiched the plastic doll charms between the sculpy, cut it into a cube and separated the halves of the mold. Then I baked the mold. The mold does get hard but you can use the "eraser" sculpy if you want a flexible mold. Once the mold was baked, I painted it with hand lotion again so it would release, then pressed sculpy into it leaving it heaping. I then pressed the top of the mold on and squished them together. After I removed the top I used the excess from the seam edges to lift the little doll out of the other side of the mold, trimmed the seams with an xacto knife, baked them and whala! I am watching a few charms on ebay too so if I win, I can see more molds in my future... being in the Halloween spirit I could not resist adding that little spooky pun :))

Monday, September 21, 2009

Rusting Technique


This is not my favorite style, I am just now a western kinda gal :)) but the theme for our shoebox project at my local stamping club last Friday was fall. The only fall saying I had was kinda western so there ya go. The real reason I am sharing this card is the rusting technique I used to make the oval sayings plaque. Some time back I had purchased some metal ovals that I loved. After using them up and not being able to find them again I decided I could make some. I punched mine from matt board then I used a brown marker on the edge but they really look like metal.

Here is how ya do it! First you will need some metal filings. If your hubby has a grinder he can make you some but if not try going to the local machine shop and ask if you can sweep some off there floor. Most of them will hand you a dustpan. Then just mix about 1 part metal filings with 2 parts black acrylic paint. Now you can paint whatever you want to look like rusted metal with that. Once it is dry mix 2 parts bleach with 1 part vinegar and paint it over your entire piece. Repeat this step until you have the desired amount of rust.


Sunday, April 20, 2008

ATC workshop ... Lesson 10, 11 & 12

Your not going to believe this one but I think I am caught up with the rest of the class! Lesson 10, 11 & 12 only had one card each :) Lesson 10 was metal tape. You just drizzle some alcohol ink onto metal tape, sprits it with the blender fluid and let that dry. Then you tear it into pieces and stick it all over the card. Once that part is finished just emboss some of the tape and layer it on. I call mine porn star … lol. Lesson 11 was a Mica card. Once you have a couple of layers cut to the size of an ATC it is done the same way with alcohol inks. When they are dry you layer a transparency between the layers of colored mica and connect the layers with eyelets. Lesson 12 was friendly plastic. I cut mine into strips and wove them together and then melted them onto the cardstock. Then I added a circle of red in the top corner and stamped a moon face into it while it was still hot. Then I pressed in the brass dragon fly and a vintage die cut on the bottom.

Saturday, March 22, 2008

ATC workshop ... Lesson 7


As promised …. Lesson 7!

The first one is a resin fresco. I started with a harvest gold cardstock and then dabbed embossing ink here and there. Then sprinkled it with ultra thick embossing powder. Then it was dry brushed with gesso here and there too. Once that was dry, I painted it with a wine acrylic paint and then with a pink metallic. It was then stamped and the edges trimmed with a black permanent marker and then again with a gold paint pen. The little embellishment was made by mixing ultra thick embossing powder with a little of the wine acrylic in a bottle cap. Then I heated the bottom of the cap with my heat gun. When it was melted I stuck a stamp that had been coated with a blue metallic pigment ink into the melted stuff. When it was cool I just peeled off the stamp.

The second one is called glass like resin. I used white cardstock and dry brushed vertically with a teal paint and then dry brushed horizontal with pink. When that was dry the entire cardstock was covered with embossing ink and sprinkled with ultra thick embossing powder. While it was hot I kept sprinkling more and more ultra thick embossing until I had a deep finish. While that was still soft, it was stamped with the swirl and the little saying. Then I used a gold paint pen on the edges and some little fairies that I had cut out of my collage sheets.


The third one I think is my favorite. It is called dimensional resin. First a sheet of mica is cut the same size as an ATC. Then metal tape is used to form walls around the edges so the resin wont run off. If you have ever made a little pan out of foil it is much like that. Then I molded a raindrop in a resin mold using melted ultra thick embossing, stirring in some blue Judikins roxs with a skewer. Then I filled the mica “pan” about half way with the same resin. I sat the whole thing on a electric fry pan to keep it liquid while I worked. Then I added foil flakes at the bottom and added the embellishments. The spider web is a Dresden foil and the little face is a metal bead. Then I finished filling the little “pan” with melted ultra thick embossing and dropped my pre-molded raindrop in. When it was cooled, the metal tape was removed. Then I stamped my newsprint stamp on the back. The words look backwards from the front but they are so small you really don’t read them anyway…at least not through the resin.

Friday, October 12, 2007

Drywall


I did these cards a while for the ladies in my local stamp group. Today we went, we stamped and we ate …lol I mixed a little latex paint into the drywall mud so they would be a little more flexible. Then I “buttered” some lightweight matt board with the paste and stamped into the goo for texture. Then I popped it in the oven at the lowest setting 170 ° and left the oven door open a crack. After about 20 minutes they were dry with no cracks. Then I just painted them and brushed them with a black inkpad. The images were colored with chalk and then cut out.