Showing posts with label Christmas. Show all posts

Saturday, December 20, 2014

Elf Yourself Puppets
Free Templates Patterns and Printable

One more post before Christmas. I did not plan this one but I wanted to do some "Elf Yourselves" with my grand kids. I looked for some free patterns but I did not find any really good ones, so I decided to make my own. I had so much fun making memories with my grandbabies! The three year old did need a little more help but he still had a blast! It is almost Christmas so tell your friends so they don't miss out of this fun activity with there little ones.


Aren't they cute!
I did not want to just print them to save on ink, these have so much color! I think the card stock looks better anyway. However we did print the hands, ears and faces. 
There are three full sheets to this set. The finished elf is about 20 inches tall. One sheet is the printable hands and ears and they should be printed on card stock. Then you will need to take a picture of your child and that should be printed on card stock as well. 
Then there are two sheets of patterns. Just print these on standard copy paper and use repositional glue to adhere them to colored card stock. Cut them out and peel off the patterns. To do the stockings, I just cut strips of red with my paper cutter, glued them across both legs and then trimmed the stripes off to the edge of the legs. We then added glitter glue to jazz them up! 

Feel free to pin the picture of the boys above but Get the pattern at my little etsy store! 
Enjoy!

Thursday, December 11, 2014

DIY Book Page Poinsettias Pattern And Tutorial

I have been making some Christmas crafts myself too! along with being busy making some new ornaments, I needed something for the top of the tree. I decided I wanted to make some book page poinsettias to match the new book page honeycomb ornaments but every pattern that I found had perfect little petals and natural poinsettias just don't look like that...so I just made one.

Even though a natural poinsettia doesn't have book page print on them I still wanted them to have a natural shape :))

Once it was completed I sprayed it with alcohol ink to give it an aged look. I liked it so well that I am doing some not just for the top but for the whole tree. I also tried one in red but I think I like the first one the best. I still have to get some beads to go in the centers. I will put them on a wire so they can just be stuck in the center. That way they can be removed so that they can be folded flat for storage. They are fast and easy and will keep from year to year... so go ahead and make a bunch! 


Pattern and Instructions are available in my little etsy store


Saturday, December 29, 2012

Little Glitter Houses and Church
Printable Christmas Ornaments


Yes Santa.... Inka is still alive :)) I am so sorry it has been so long and I had some great free Christmas graphics planned. Not to mention I wanted to get my Nutcracker Theater in my little etsy store. I made the characters from redressed Tuck and Sons paper dolls and the Theater is just an amazing Christmas fantasy! However I still have some work to do on the nutcracker character but he is coming along nicely.

It seems that the past few years life has just gotten in the way of my blog this time of year. This year my daughter in law was ill. It took the doctors several weeks to figure out that her gallbladder had problems, then the surgery, then the recovery. So during all this time I had my grand babies. Taking on a 14 month old when you have MS is an ENORMOUS undertaking! Sitting at the computer while watching him was mission impossible! Although his brother who is 5 helped a lot, by time I got him in bed at night I would just collapse. Then to top that off hubby has kidney stones and was on the couch for several weeks too.... no help there...lol.

Once the boys went home, I had Christmas staring me in the face. I usually have the decorations up and the gifts bought by the day after Thanksgiving. This year we skipped Thanksgiving and I was still doing some shopping the day before my big Christmas eve party. So I thought I would share some pictures of our holiday decor and the little graphic for my ornaments.


 Our tree was dressed in crystal icicles, little news print houses and little music print churches. The graphic for these print with the news print and music print already on them. Now available in my little etsy store. I also I glued a heavy wood bead inside the house to weight the other side. That way the little tree did not make the ornament hang crooked. However you would not have to put a little tree on yours I just felt it really dressed them up. You might have other ideas that will work just as well.


I wrapped the gifts in newspaper and burlap ribbons


The stockings were hung by the chim... well the coat rack with care :)) I made them from vintage lace table cloth and they are reversible. You can cuff them if you like but I ended up with too much to put in them so by Christmas they were hung without the cuff.

 
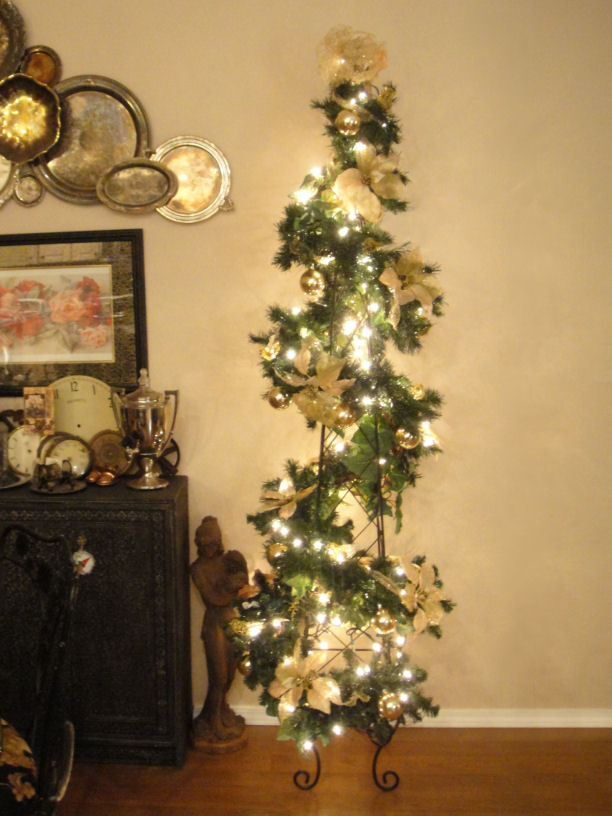
The topiary was dressed in gold this year.


And my daughter in law did a lovely job decorating the chandelier.

We hung glitter snowflakes from the ceiling as we always do. This picture really doesn't do them justice. They spin and twinkle with every movement and it just sets such a holiday mood.


I even changed the display in my glass cloche for the season.

Well there you have it :))


Sunday, December 12, 2010

·:*:·.·::·.·:*:·. It's beginning to
look a lot like Christmas ·:*:·.·::·.·:*:·.

·:*:·.·::·.·:*:·..·::·.·:*:·. All around the house ·:*:·.·::·.·:*:·..·::·.·:*:·.


Our family is wrapping up the presents

 Buildin a few snowmen...


and puttin up the tree!
And looking forward to a Merry Merry One!
We are also wishing you and yours a Very Merry Christmas too!

.·::·.·:*:·.·::·.Christmas In A Box .·::·.·:*:·.·::·.

My sister is not going to be able to make it here for Christmas this year because she has to work :( She is going to be all alone this year for the first time. When I last talked to her she said there was no since in even putting up a tree just for herself so I am sending her Christmas in a box...

Included is a sparkling Christmas place mat, a Marie Calendars turkey dinner, a tiny version of our traditional Christmas cake, A Christmas tree, our childhood Santa and presents including that little rag necklace and earrings I made for her.

Oh ... and here is a close up of the necklace and earrings I sent.It features a soldered centerpiece, vintage ribbons and lace, a vintage rhinestone button, vintage flat crystal beads and some other reclaimed jewelry parts.
 

Tuesday, November 30, 2010

Christmas Advent Calender Countdown...

So I was doing a bit of grocery shopping and found this little advent calender and it was on sale...but just not my style...so what to do?....Alter it :))
Well I was just getting the finishing touches on it when I saw that the "Created byhand Challenge" was Christmas Countdown! So of course I had to entry mine :))

First I wanted to show the before... but I forgot to take a picture of it before but here is one I found on the internet.

I tell myself that I did this for my little grandson Quinton but really I think it is just as much for me. I can't wait to see and share the countdown with him! A tradition I hope to carry on for many years to come.


... this is the "After" with it closed... You can click on the pictures to see a larger one .... 

and this is the inside.. The stamps are from "Scroll Works" and all the printed images are from my little etsy store... again you can click on the little picture to go to a larger one


Monday, November 22, 2010

Faux Putz House Christmas Ornaments

Boy am I getting this in just under the wire! This weeks Theme over at the "Created Byhand Challenge" is Snowmen...Aren't these cute! This was also my project for my local art group "The Artistic Souls" this month too.
 

I used the pattern from Better Homes & Gardens and then I used some of my digital collage sheets that I offer over at my little etsy store. I did shrink them to 50% before I printed them so they would fit on my little houses.

Wednesday, November 3, 2010

Winter Gothic Arch Banner

When I saw the inspiration project by Nancy on the Gothic Arches challenge and the them was "text" I knew instantly what I would do. I used my new snow angles that are available in my little etsy store and the banner graphics are now in the store too! I also felt that my project was perfect for Saturday Surprise as well because it has all the little trinkets that remind me of all the holidays spent at home in my youth.


Friday, December 11, 2009

Dead Tree Christmas Card

For the past few months one of the local stamp clubs I attend has had a round robin stamp challenge. Several months ago we each brought a stamp and each month we have rotated them so that each person has a turn with each stamp. Our sweet Judy brought a dead tree stamp and we all bemoaned our turn with it. However month by month we were amazed with what the designated person came up for it. I actually think it challenged us more than any of the other stamps as we really had to contemplate our design. We had more fun trying to come up with something different. Anyway I was last on the list and this is what I did with it. I first stamped the nest from Scrolls Work Rubber Stamps then I masked it off and stamped the Cardinal... also from Scrolls Work. Then after those were masked off I stamped the dead tree from Stamps by Judith. It does look a lot better in real life... you can't really see that the cardinal has black stickels and a seed bead for the eye. I also added white stickles here and there on the branches, in the end... I really liked it! 

Saturday, December 20, 2008

Gingerbread Christmas

I just want to apologize for not keeping up with my blog to well lately. I have made sure to post the blog candy because so many of you look forward to it and I just can’t disappoint you :) but I have been disappointing myself by not getting my artwork posted.

However it has been the holidays and I have been so into doing things with and for my family. This is my little prince Quinton eating the gingerbread cookies I made for him. I also did a gingerbread house but he has to wait for Christmas eve to eat that with the other kids in the family… and I filled the inside of the little house with party favor toys so when they break it open there will be a fun surprise :)


Thursday, November 13, 2008

Three little kittens ,,,^..^,,,~~,,,^..^,,,~~,,,^..^,,,~~

 
... are hoping for mittens :)) and since they are faithful friends they should get them too! I could not wait to play with the new Christmas hats and cats and dogs collage sheets but it was really hard to photo because I used a gold paint pen on the hats and it has sparklies all over it.

Saturday, November 1, 2008

Tinsel Ornaments *<} :o } >>>

Have yourself a vintage little Christmas
.·::·.·:*:·.·::·..·::·.·:*:·.·::·..·::·.·:*:·.·::·..·::·.·:*:·.·::·.
 
 These really are easier than they look, they are just dressed up ornaments from the dollar store. The instructions for the styles I have done are below but you really could just let your imagination run wild. Each ornament has the same image on the backside but I used my mirrored images available at my little etsy store.. it so that it would look the same no matter what side you were looking at. I will also be recommending some products that I have used but I am in no way connected with these companies, I just like there products.


First decide what images you are going to use and cut them out. I love to do intricate cutting by if your not great with cutting things out you can just leave a quarter inch margin around the edge. If you do this however it will look better if you take a gold paint pen and run it around the edges.


The simplest ones were the last three you see on the bottom. To make these just crisscross a couple of shiny pipe cleaners and give them a couple of twists in the center as you see in picture 1. Then weave some tinsel back and forth around them as you see in picture 2. Curl the ends of the pipe cleaners and glue your images on. One on the front and the other on the back. If you want something a little more durable you can buy the flat wire ornaments. I found the star I used on the last one also at the dollar store.

For the birdcage I used five silver pipe cleaners and then twisted them together with a gold one. Then I wrapped one end of the gold pipe cleaner to form a ring as you see in the picture 3 and left the other half long. Once that was done I attached the other half of the gold pipe cleaner to the hanger on a Christmas bulb leaving only about two thirds the length of the silver ones. This will keep the “cage wires” from pulling straight when hung. Then glue another pipe cleaner around the circumference of the bulb and attach the silver pipe cleaners to that and curl the ends up. Wrap some tinsel around the center gold pipe cleaner and embellish to your hearts content.


I have recently discovered a glue called Zip Dry paper glue and I use it for just about everything. It sets quickly so your not holding things forever while they dry. It is the type of glue you find on the backside of a sticker so if you glue something where you don’t want it you can use another product called Un-Du scrappers solution to remove it and place it in the right spot without ruining the image or item you removed. As you can imagine, doing this kind of project your going to get glue all over your hands and enviably on the project where you don’t want it. However you can use the Un-Du to clean up your project too.                          


For the hot air balloon I used string tinsel. It may look like pipe cleaners but it is not. Cut a length of it long enough to go around the top section of the bulb and attach four lengths to it evenly spaced as you see in picture 6.Glue that around the top section of the bulb as in picture 7. Wrap a wooden block in foil paper and attach the tinsel strands to the sides of the block and embellish as you like. 

The others are just old fashion glass ornaments and a tree topper that I glued embellishments onto. I used Tinsel garlands, foil pipe cleaners, bead trim, fabric trims and I love Dresden foil. It is hard to find so if you don’t happen to have any Dresden foils try going to your party store and picking up some gold foil doilies from the wedding section. The edges of these can be cut off to form paper lace and sometimes you can find lacy medallions in the center that can be cut away and used too.


Tuesday, November 13, 2007

Christmas Eve House


Ok … the little house … or church you all have been waiting for…this is my first attempt at soldering something dimensional…it was a learning experience for sure! But for my first one, I am pleased. I put a little battery powered tea light inside it and it looked great but it did not picture well. The battery tea light is smokeless so you don’t have to worry about having a way for the smoke to escape or it getting to hot, yet you still have the ambiance. I will have the kits for this and for one that doesn’t have such a steep roof available soon. I will also have the house shapes to sandwich images between. Smaller houses for charms will come with the small circles when the thinner glass arrives. They have to be made from the thinner glass.


I am calling it my Christmas eve house as that is the big day in our family. That is the day we have a huge party, open our gifts and Santa comes :)) By Christmas day it is all over with but the eating … lol
Most of these are made by sandwiching your images between two sheets of glass and then soldering it like you would a charm. This one is made of a single panel of glass. I don't have a lot of storage space so I wanted to be able to change the images for the season. I used "Tack-it-over-and-over" glue just on the edges of each collaged image so it only hits the soldered area. This way it can be removed and saved for next Christmas. The Number also has the "Tack-it-over-and-over" glue. Then I have saved the backing paper after I used my xyron so that I can store the images sandwiched between when the time comes. I have already started the "Valentines" images and eventually I will have a set for the entire year.